fbpx

recipe developer . podcast co-host . cookbook author . photographer . mental health warrior . online educator


food . travel . life

keto . low carb


gluten-free . grain-free . sugar-free

drama-free . dogma-free . mean-free

Keto Cookbooks

Archives

Trending!

Almond Custard (+ VIDEO!)
Blackberry Almond Fool
Liposomal Vitamin C (+ VIDEO!)
Superpower Porridge
Lasagna
Strawberry Almond Porridge
Creamy Peanut Butter Mousse (+ VIDEO!)
Salmon Asparagus Bake
Creamed Chicken and Cabbage Casserole
Avocado and Walnut Salad

Copyright © Carrie Brown 2010-2020, unless otherwise stated. All rights reserved.

Strawberry Rose Panna Cotta

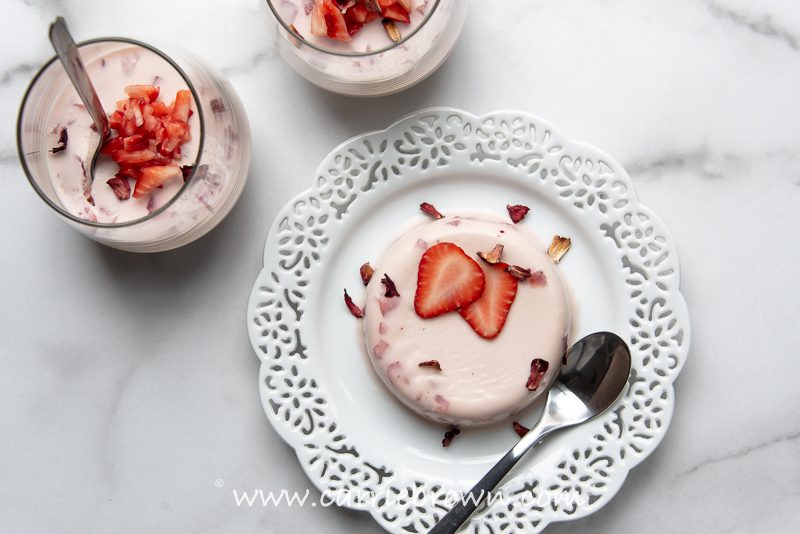
There’s something you might not know about me. I love roses. I mean, I *really* love roses. The scent of them. The look of them. And the taste of them. Every Christmas when I was a child I delighted in the box of Rose Turkish Delight that graced the candy table. We only had candy once a year, so I mostly inhaled all the rose-flavored jellies as soon as the wrapper was off the box. I’m not quite sure what made my thoughts go to rose this week, but I had some strawberries nestled in the fridge and decided that we all needed something to make us feel summery. To me, there’s not much more summery than strawberries and roses. So I made you Strawberry Rose Panna Cotta, and it turned out perfectly for a light, summery dessert that takes few ingredients, very little work and totally hits the ‘treat’ spot. I feel like we all need a little treat right now.

Strawberry Rose Panna Cotta | Carrie Brown

Frozen strawberries are an entirely different beast to fresh strawberries. The flavor is different, the texture, even the color. You could make these with frozen strawberries if that’s all you can get, but if you go that route I would thaw and drain them really, really well – overnight, even – before weighing and adding to the pan. The amount of liquid expressed from a frozen strawberry could play all sorts of havoc with your panna cotta’s ability to set.

Talking of liquids, if you don’t have or can’t get rose extract for your Strawberry Rose Panna Cotta you can use vanilla extract, but I highly recommend the rose. Even if you do it with vanilla this first time, I would encourage you to put rose extract on your Amazon list.

The balance of liquid to gelatin in a panna cotta can be the difference between a “WOW!” dessert and an “OK” dessert. I’m aiming for you all to get “WOW!”

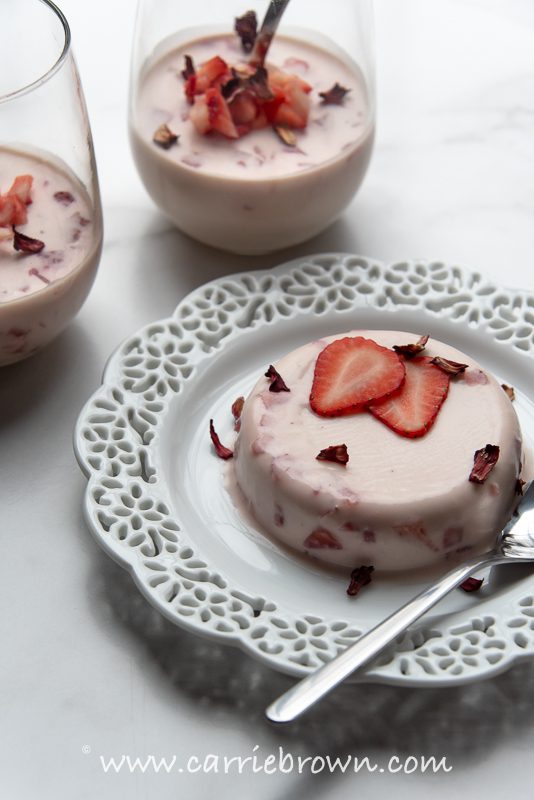
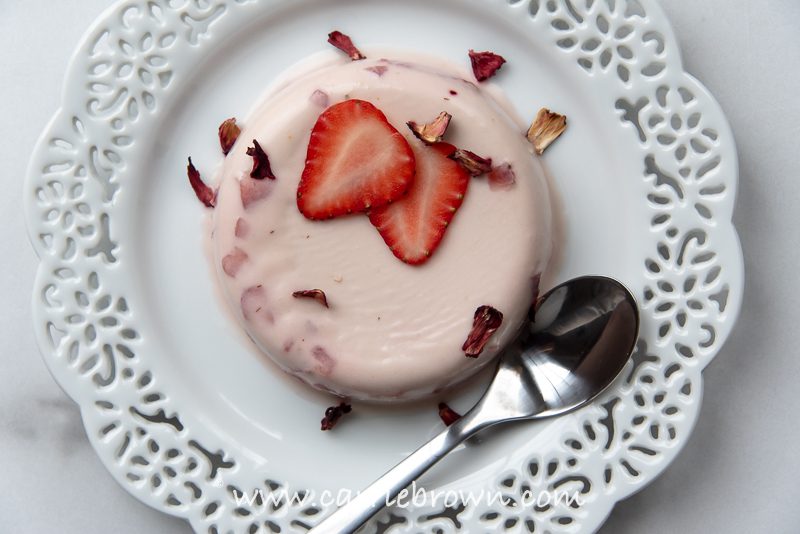
This Strawberry Rose Panna Cotta is light enough after a slap-up celebration meal, but also swanky enough to make your friends think you spent hours working on it, especially if you break out the fancy dishes and take a few minutes to pretty it up with some extra strawberries and (edible) dried rose petals. But it’s also simple and easy to make, and can be made ahead so you don’t have a time crunch on the day.

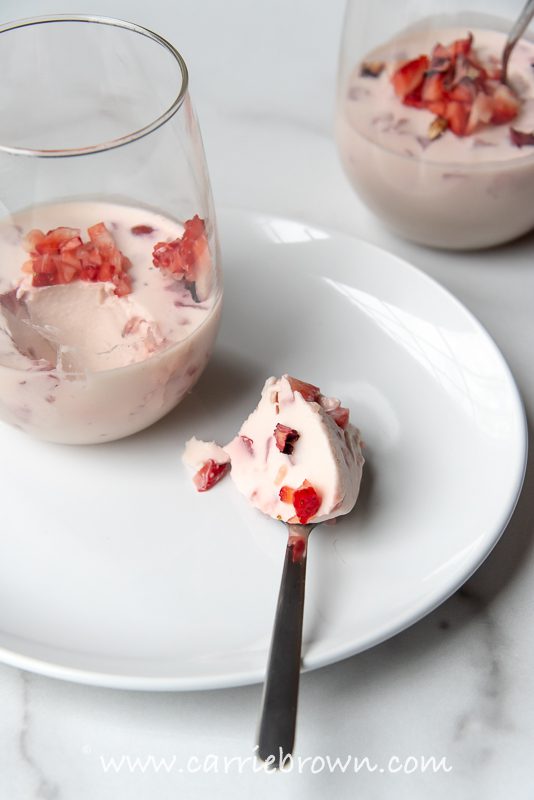
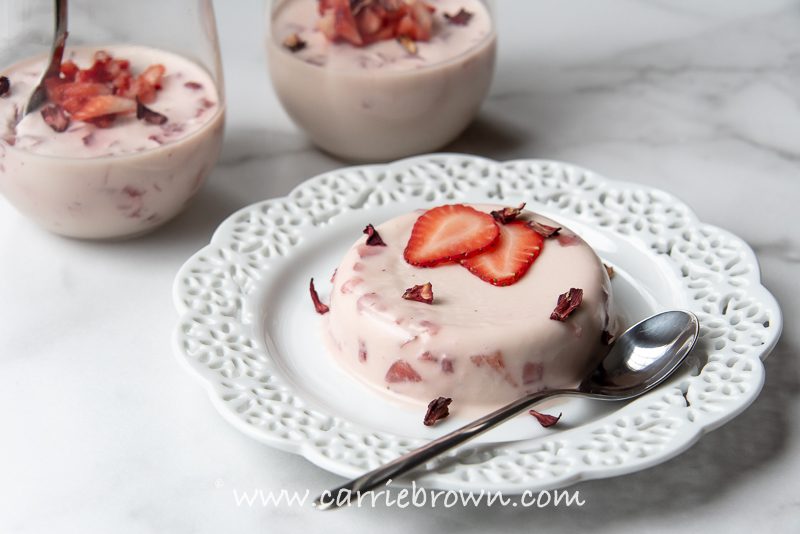
Swanky dinners aside, I just enjoy one of these after a week-night dinner. A little something to round things out, add an extra dollop of fat, and a big helping of feel good. To that end, you really don’t need much, so making them in two-mouthful shot glasses or mini ramekins or dishes would be a great option for a fat-bomb. You should avoid using silicone molds because they do not set solid enough to get them out.

For glasses or dishes, once the Strawberry Rose Panna Cotta is set, cover with plastic wrap and keep in the fridge. Another every day option would be to spoon the mousse into baby Mason Jars or  baby Pyrex (so adorable!) and just whip one out every day or grab one as you pass the fridge on the way to work.

Strawberry Rose Panna Cotta | Carrie Brown

Now, if you use dishes and want to turn yours out like I did, there’s a couple tricks to that.

  • Make sure your dish is wider at the top than the bottom.
  • Only half fill your dish, otherwise it will be harder to get out.
  • Put enough hot water in the sink to come up just to the same level as the top of the panna cotta in the dish.
  • Stand the dishes (one at a time) in the hot water for about 30 seconds. Put a plate upside down on top of the dish, and holding both the plate and the dish flip the dish over. Give a firm shake. Carefully lift up the dish. If the panna cotta is not on the plate when you lift the dish, turn the plate and dish back over and then put the dish back in the hot water for another 15 seconds. Repeat with the plate flip thing. I can feel a video coming on.
  • Daft though it might sound, it tastes different when you spoon it out of a dish or glass. Or maybe that’s just me.
Strawberry Rose Panna Cotta | Carrie Brown

However you decide to serve your Strawberry Rose Panna Cotta, get thee to your kitchen and get some going today. Oh, and the flavor is better if they are not fridge-cold when you eat them. The butterfat in the cream can leave a little bit of palate-cling round your gob if you eat it straight from the fridge. You’re welcome.

Strawberry Rose Panna Cotta

Author: Carrie Brown | Prep time: 15 mins | Cook time: 0 mins | Total time: 15 mins + 4 hours setting | Serves: 4 – 6 as dessert, more if making as fat bombs

What You Need

  • 6 TBSP cold water
  • 2 1/2 tsp. gelatin or agar agar
  • 2 oz / 55g allulose OR xylitol or erythritol
  • 6 oz / 170g fresh strawberries
  • 1 1/2 cups / 12 fl oz. heavy cream
  • 1/2 cup / 4 fl oz. almond milk
  • 1 tsp. rose extract
  • 6 oz / 170g fresh strawberries (optional extra strawberries)

What You Do

  1. Put the cold water in a small dish and sprinkle the gelatin evenly over the surface. Allow to stand for at least 5 minutes.
  2. Put the sweetener, strawberries, heavy cream, almond milk, and rose extract in a pan on medium heat, stirring until the sweetener has completely dissolved and then bring just to a boil.
  3. Turn the heat off and let sit for 5 minutes.
  4. Carefully pour the cream mixture into a blender and blend on low until the strawberries are completely blended.
  5. Place a fine mesh sieve over the pan you used to heat the cream and pour the warm blended mixture through the sieve to catch the strawberry seeds.
  6. Add the soaked gelatin to the blended mixture in the pan and place over the lowest heat, stirring until the gelatin is completely dissolved.
  7. Remove from the heat and leave to cool to room temperature, stirring every half hour.
  8. Meanwhile, finely chop the optional extra strawberries and distribute evenly among your serving dishes or glasses. Place the serving dishes on a large plate. The plate just allows you to carry the glasses steadier and move them all at once without slopping the cream mixture all up the sides.
  9. Once the strawberry cream mixture is at room temperature, stir well and then carefully pour it over the chopped strawberries in your serving vessels.
  10. Carefully carry the plate to the fridge and leave for at least 4 hours to set.
  11. If you used dishes and want to turn them out onto plates like I did, check out the bullet list above before the recipe for some tips and tricks on that.

Top Recipe Tips

  • The wider the dish you use for the water is, the easier it will be to sprinkle the gelatin evenly over it and make sure it all softens.
  • Use beef gelatin as opposed to pork. I don’t have time to explain why, it’s long. Just trust me when I say that beef gelatin is more reliable. I have linked to the specific brand that I use.
  • If you want or need to cut the carbs, or you prefer a truly smooth panna cotta, leave out the optional chopped extra strawberries.
  • Really?? Leave it to cool to room temp before pouring it in things? That’ll take hours. Yep. If you skip this step there is a large chance that your panna cotta will separate into layers. And then you’ll be sad.

Helpful Cooking and Recipe Links

Podcast Episodes and You Tube Videos

Substitutions

  • Don’t. Just buy the correct ingredients and you, too, shall have a fabulous outcome!
  • Xylitol and allulose are the sweeteners I recommend because they work very well. I also recommend erythritol if allulose or xylitol give you issues, but erythritol can be tricky to use successfully. You can use any other sweetener you like, but I cannot guarantee the results if you choose to use something different. In low carb and keto baking sweeteners are generally not interchangeable if you want great results.
  • The alternative to gelatin is agar agar.
  • Sub thick coconut milk for heavy cream to make dairy-free. The flavor of the mousse will be materially different since the strawberry and rose are subtle.

1 comment
Add a comment...

Your email is never published or shared. Required fields are marked *

  • KateIf I had to use blueberries rather than strawberries, would it make a massive texture difference?ReplyCancel

Italian-Style Creamy Baked Eggs

I know a lot of you are yelling, “Shakshouka! Shakshouka!” right now. And you would be warm. But not hot. Because these Italian-Style Creamy Baked Eggs are a lot more than Shakshouka. More substantial, more filling, more delicious, and more keto. Even though it sneakily looks pretty much exactly the same.

Italian Style Creamy Baked Eggs | Carrie Brown

These Italian-Style Creamy Baked Eggs are great for any meal at any time of day. We had them for brunch when I whipped them up and they kept us full all day. Add some Foxhill Kitchen Bunz to sop up all those tomatoey juices and wonder why you ever thought eating low carb or keto was boring or tasteless.


Italian-Style Creamy Baked Eggs

Author: Yogi Parker| Prep time:  10 mins   |   Cook time:  30 mins  |   Total time: 40 mins  |  Serves: 2 – 4

What You Need

  • 2 TBSP butter
  • 1 onion, chopped
  • 4 garlic cloves, roughly chopped
  • 1 lb / 450g ground Italian sausage
  • 6 oz / 170g sliced mushrooms
  • 24 oz / 670g marinara (or pasta sauce)
  • 1 cup / 8 fl oz heavy cream
  • 1 tsp Italian seasoning
  • 3 oz / 85g grated Parmesan
  • 12 oz / 335g mozzarella cheese, shredded
  • 4 eggs
  • Sea salt and ground black pepper
  • 2 TBSP olive oil
  • OPTIONAL (but awesome): Foxhill Kitchen Bunz and use code carrie for a 15% discount!

What You Do

  1. You will need an oven safe deep sided skillet. A cast iron skillet is perfect for this.
  2. Pre-heat oven to 415 degrees.
  3. Place skillet on stove over medium heat.
  4. Add butter and onions and sauté until onions begin to turn translucent, then add garlic and continue to sauté for about a minute.
  5. Add Italian sausage and lightly brown the meat, chopping it up as you stir.
  6. Add the mushrooms and continue to cook for about two minutes.
  7. Add the marinara, heavy cream, and Italian seasoning and stir to incorporate all ingredients well.
  8. Allow mixture to come to a boil, then reduce heat and allow to simmer for about twenty minutes until it thickens.
  9. Add 2 oz / 55g of the grated Parmesan and stir to incorporate well.
  10. Sprinkle the mozzarella evenly over the sausage sauce and then crack the eggs into various spots on top of the dish, season with sea salt and ground black pepper and sprinkle with the remaining Parmesan.
  11. Place pan in the oven to bake for about 12 to 15 minutes, uncovered.  If you like your yolks on the harder side, continue cooking for a few more minutes.
  12. Remove the dish from the oven and allow to rest for at least ten minutes before serving.
  13. Drizzle some olive oil over the top just before serving.

Top Recipe Tips

  • This is a dish you can really play with.  If you cannot find a clean Italian sausage, any ground meat can work.  Ground veal and lamb are great in this.  Other veggies can be added as well, such as artichoke hearts, spinach, peppers or leeks can be great additions. 
  • Some great toppings and garnishes are fresh chopped basil, green onion, olives, or crispy fried prosciutto pieces.
  • Can be served on top of some squash or Konjac noodles, cauliflower rice or eaten on its own.

Helpful Cooking and Recipe Links

Podcast Episodes and You Tube Videos

Substitutions

  • Don’t. Just buy the correct ingredients and you, too, shall have a fabulous outcome!
  • See Top Recipe Tips above.

Italian Style Creamy Baked Eggs | Carrie Brown


1 comment
Add a comment...

Your email is never published or shared. Required fields are marked *

  • LaineThis is my favorite Eggs in Purgatory type recipe! I also added some zucchini and topped with green onions but I really want to try it topped with prosciutto like you suggested. So good!ReplyCancel

Salmon Asparagus Bake

Last week I made you Lemon Dill Sheet Pan Salmon, and this week I made you Salmon Asparagus Bake so you could have something completely different from the very same ingredients. If you like to avoid waste, get frustrated not knowing what to do with leftover ingredients that you bought for another recipe, or you don’t like eating the same meal two days running, this whole two-different-recipes-from-one-set-of-ingredients will really appeal to you.

Salmon Asparagus Bake | Carrie Brown

This is another easy way to become comfortable with cooking salmon, and honestly it’s pretty hard to ruin poached salmon since it is cooked in liquid which prevents it drying out. And if you happen to under-cook it during the poaching part you’ll still be good because the heat of the sauce and the final broiling will finish it off nicely.

Salmon Asparagus Bake | Carrie Brown

Salmon and leeks go so well together – neither is overwhelmed by the flavor of the other, and the lemon and dill just marry it all together. Asparagus is another mild-tasting vegetable that doesn’t have to fight with the salmon to be appreciated.

Salmon Asparagus Bake | Carrie Brown

This Salmon Asparagus Bake is both light and hearty all at the same time. It can be eaten on it’s own or would also be lovely served with a simple green salad. If you are making this in the same week as the Lemon Dill Sheet Pan Salmon you can save a bunch of time by preparing the vegetables for both dishes at once and storing half in an airtight container in the fridge.

You can change things up by using different cheeses to finish it off, or omitting the cheese altogether if you need a dairy-free dish. You can also use different fish if something else suits your location and / or budget better.

If I wasn’t continually dreaming up new recipes this Salmon Asparagus Bake would definitely be in my regular rotation!


Salmon Asparagus Bake

Author: Carrie Brown | Prep time: 15 mins | Cook time: 20 mins | Total time: 35 mins | Serves: 4

What You Need

  • 2 cups chicken stock (or bone broth)
  • 1.5 lbs / 670g salmon fillets
  • 1 TBSP avocado oil or coconut oil
  • 1 TBSP butter
  • 14 oz. / 390g asparagus, trimmed and cut into 1″ lengths
  • 9 oz. / 250g leeks, thinly sliced
  • 1/2 cup / 4 fl oz. heavy cream
  • 1 TBSP lemon juice
  • 2 tsp. konjac flour / glucomannan powder
  • Sea salt and ground black pepper (Get the best sea salt here and use code: carriebrown for 15% discount!)
  • 2 TBSP fresh dill
  • 2 oz. / 55g cheddar cheese, grated

What You Do

  1. Place the chicken stock in a large skillet and lay the salmon fillets into the broth. Turn the heat on low and gently poach the salmon until the flesh is just opaque. Turn off the heat, carefully lift out the salmon pieces onto a plate and pour the broth into a jug and set aside.
  2. Put the oil and butter into the skillet over a medium heat, add the asparagus and leek pieces and saute, stirring often, for about 10 minutes until they are just tender.
  3. Meanwhile, cut the salmon into bite-sized pieces.
  4. Pour the reserved stock back into the skillet with the sauteed veggies, add the cream and lemon juice and stir well over medium heat.
  5. Bring the sauce to a boil, turn down the heat to low, and gently tap the konjac flour into the sauce while whisking rapidly with the other hand until fully incorporated.
  6. Add the salmon pieces, season with sea salt and ground black pepper, add the fresh dill and stir well.
  7. Spoon the salmon mixture into a casserole dish and sprinkle the top evenly with the grated cheese.
  8. Bake in the oven at 400 F for about 15 minutes until the cheese is golden and bubbling.

Top Recipe Tips

  • Use skinless salmon fillets for ease. If using skin-on fillets, carefully peel the skin off after poaching and before cutting into pieces.
  • To increase protein use bone broth instead of stock.
  • If you have to use dried dill, reduce amount to 3/4 TBSP and add it with the heavy cream in step #4.
  • Change up the flavor a little by using a different hard cheese or blend of cheeses. Think Gouda, mozzarella, or Gruyere for example.
  • This would also work with white fish if that’s what you have or can get hold of. The fat content will be lower if you do so.

Helpful Cooking and Recipe Links

Podcast Episodes and You Tube Videos

Substitutions

  • Don’t. Just buy the correct ingredients and you, too, shall have a fabulous outcome!
  • Steelhead Trout can be used instead of salmon if that fits your location or budget better.
  • To make dairy-free use more oil instead of the butter, and replace the heavy cream with thick coconut milk (in a can).

Salmon Asparagus Bake | Carrie Brown

0 comments
Add a comment...

Your email is never published or shared. Required fields are marked *

    Lemon Dill Sheet Pan Salmon

    The Orange Thyme Sheet Pan Pork Chops were such a huge hit that I decided a bevy of super-easy, super-fast, super-tasty sheet pan dinners were in order. Enter Lemon Dill Sheet Pan Salmon. Because salmon is a super-good choice for keto and low carb plates – packed with omega-3s it is one of the fattier fish and a delicious lighter alternative when you just don’t feel like cramming a bunch of meat in your mouth.

    Lemon Dill Sheet Pan Salmon | Carrie Brown

    If you are not familiar with sheet pan dinners, they are essentially just all the things cooked in the oven on the same pan at the same time. A lot of sheet pan recipes you’ll find on the interwebs, though, call for adding a bunch of things at various different times throughout the cooking process, which in my mind kinda negates the whole point of a sheet pan dinner.

    This Lemon Dill Sheet Pan Salmon is a proper sheet pan dinner: everything goes on the pan at the same time, gets shoved in the oven, and 20 minutes later the pan comes out again with everything perfectly cooked. No fiddling, no opening and closing of the oven door multiple times, no adding things part way through. No having to remember when to add things either. Nope, this is a really easy way to make a pan full of delicious dinner.

    Lemon Dill Sheet Pan Salmon | Carrie Brown

    The salmon fillets are given a crispy lemon-almond crust, with the lemon continued through the veggies. This Lemon Dill Sheet Pan Salmon mostly tastes like summer, but it’s surprisingly filling for something that tastes so light.

    When cooking multiple pieces of salmon it is always best to choose pieces that are around the same thickness so that they all cook in the same time. Otherwise, some poor soul(s) is going to get dry salmon, and no one wants that. A beautiful piece of cooked salmon is a joy. Overcooked, dry salmon? Not so much. In this recipe I would suggest that you use thicker pieces rather than the tail pieces which are thinner.

    The veggies in this Lemon Dill Sheet Pan Salmon are not the slightest bit dry, either, although you would be forgiven for thinking that they might be. The mayonnaise does a bang up job of coating them in flavor while also keeping them moist and delicious.

    Lemon Dill Sheet Pan Salmon | Carrie Brown

    I usually have a bag of Kirkland Salmon fillets stashed in the freezer for when I get the urge, even though I live on the coast and have more than ample options when it comes to fresh fish. The great thing about frozen salmon is that even all you land-locked folks can enjoy this year-round and without the fluctuation in prices that often accompanies fresh fish.

    Now, if you have always been leery of sheet pan dinners because washing a full-sized sheet pan is no bueno in some dishwashers, and it’s too big to manhandle in the sink easily, just use two half sheet pans instead! Or, if it’s just 1 or 2 of you, simply half the recipe and just use one half sheet. Boom!

    If you’ve always been a bit nervous of cooking salmon, this is a great introduction. There’s no anxiety over wondering if it is done, just set the timer and be ready to chow down when the timer goes, “Ping!”


    Lemon Dill Sheet Pan Salmon

    Author: Carrie Brown | Prep time: 10 mins | Cook time: 20 mins | Total time: 30 mins | Serves: 2 – 4

    What You Need

    • 1 large lemon – zest and juice
    • 8 oz / 225g leeks, sliced cross-ways into discs
    • 26 oz. / 730g asparagus, trimmed and cut into 1″ lengths (see Top Recipe Tips)
    • 3/4 cup mayonnaise
    • 4 tsp dried dill
    • Sea salt and ground black pepper (Get the best sea salt here and use code: carriebrown for 15% discount!)
    • 3 oz / 85g flaked or sliced almonds
    • 1 egg, beaten
    • 1.5 lbs / 670g salmon fillets (see Top Recipe Tips)

    What You Do

    1. Pre-heat oven to 425F.
    2. Zest the lemon and place zest in a shallow dish and put to the side.
    3. Juice the lemon and put the juice in a large bowl.
    4. Add the sliced leeks and asparagus in the bowl with the lemon juice, add the mayonnaise, dried dill, sea salt, and ground black pepper, and toss until all the veggies are thoroughly coated. Go on! Use your fingers to do the tossing!
    5. Spread the coated veggies evenly over the sheet pan in a single layer.
    6. Add the flaked almonds, sea salt, and ground black pepper to the lemon zest in the shallow dish and mix very well. Spread the almond mixture evenly over the bottom of the dish.
    7. Brush one side of a salmon fillet (if one side has skin, do NOT coat that side) with the beaten egg and then press firmly into the almond mixture.
    8. Lay the salmon almond side up on top of the veggies on the sheet pan.
    9. Continue egging and pressing the almond mixture onto the salmon fillets and placing them on the veggies crust side up one-by-one until you have used them all.
    10. Place the sheet pan on the middle shelf or your pre-heated oven and bake for 15 – 20 minutes until the nuts are golden brown. The time will vary depending on the thickness of the salmon fillets.

    Top Recipe Tips

    • Use ‘skinny’ asparagus. Thick asparagus is likely to be under-cooked. If thick asparagus is your only choice then you could put the veggies in the oven for 5 minutes, then carefully remove the sheet pan, add the salmon and return to the oven for the full time.
    • You can make the crust ahead of time and store in an airtight container in the ‘fridge to make prep super-fast.
    • Try to get your salmon fillets all the same thickness and size so that they all cook in the same time. Look for thicker pieces for this recipe. Frozen or fresh salmon are both fine.
    • Instead of brushing the salmon with egg you can put the beaten egg in a shallow dish and dip one side of the salmon in before pressing in the almond mixture.
    • If you coat both sides of the salmon in the almond mixture the side that is laying on the veggies will be soggy. Not recommended. Plus, you’ll need more almond mixture.

    Helpful Cooking and Recipe Links

    Podcast Episodes and You Tube Videos

    Substitutions

    • Don’t. Just buy the correct ingredients and you, too, shall have a fabulous outcome!
    • Steelhead Trout can be used instead of salmon if that fits your location or budget better.
    Lemon Dill Sheet Pan Salmon | Carrie Brown

    2 comments
    Add a comment...

    Your email is never published or shared. Required fields are marked *

    Dark Chocolate Chili Mole

    Sometimes you just want a darn good chili, especially on a cool or cold day. Or you want a chili dog or chili burger while watching the game. As a trucker, you don’t always have a lot of time for prep and cooking, but you always want something that is delicious and sticks to the ribs. Here is a quick down-and-dirty chili recipe that is hearty and filling, and the addition of a few special ingredients really adds some extra dimension of flavor. I give you Dark Chocolate Chili Mole.

    Dark Chocolate Chili Mole

    Dark Chocolate Chili Mole

    Dark Chocolate Chili Mole

    Author: Yogi Parker| Prep time:  15 mins   |   Cook time:  30 mins  |   Total time: 45 mins  |  Serves: 6 – 8

    What You Need

    What You Do

    1. Chop the bacon into pieces approximately the size of a quarter and brown in a skillet.
    2. Remove bacon into a bowl and drain off most of the grease from the pan, leaving just enough to sauté with.
    3. Sauté the onion until translucent and set aside with the bacon.
    4. Sauté the beef and when it just begins to brown, add the bacon and onion back, then add all the seasonings and stir well to incorporate.
    5. Add the bone broth / beef stock, tomato paste, tomatoes, the rest of the veggies and apple cider vinegar.
    6. Stir to incorporate well and season again with salt and pepper to taste if needed.
    7. Reduce heat to low and simmer for about twenty minutes, stirring occasionally.

    Top Recipe Tips

    • If you don’t like spicy, omit the jalapeño, but if you like spicy, add more jalapeños or a spicier pepper of your choice.
    • Omitting the bacon and adding chorizo will give you a different flavor.

    Helpful Cooking and Recipe Links

    Podcast Episodes and You Tube Videos

    Substitutions

    • Don’t. Just buy the correct ingredients and you, too, shall have a fabulous outcome!
    • You an use ground bison instead of beef.

    Dark Chocolate Chili Mole

    Dark Chocolate Chili Mole

    2 comments
    Add a comment...

    Your email is never published or shared. Required fields are marked *

    • Lori WThis looks amazing. I am always impressed by both Carrie and Yogi’s recipes. Can’t wait to try this. Thanks for all you do. ReplyCancel

    • KathleenI made this Chile Mole yesterday, and let me tell you – IT’S FABULOUS!  I’ve never wanted wanted to try chocolate with any protein, but after reading the recipe, I thought “Why not?”  And of course, there’s that pound of bacon – what could be wrong with that?  :)  It goes together quickly and the first taste left me totally aghast – the chocolate is not front and center, as I thought (was afraid) it might be – oh no, the flavor has a depth and complexity that must be tasted to be believed.  We  have a chili recipe which we’ve made for years, but this one’s a keeper, as a luxurious alternative.  Just OUTSTANDING!!! <3ReplyCancel