fbpx

recipe developer . podcast co-host . cookbook author . photographer . mental health warrior . online educator


food . travel . life

keto . low carb


gluten-free . grain-free . sugar-free

drama-free . dogma-free . mean-free

Keto Cookbooks

Archives

Trending!

Almond Custard (+ VIDEO!)
Blackberry Almond Fool
Liposomal Vitamin C (+ VIDEO!)
Superpower Porridge
Recipe Index: Find the recipe you need here
Creamy Peanut Butter Mousse (+ VIDEO!)
Vanilla Cranberry Shortbread
Avocado and Walnut Salad
Salmon Asparagus Bake
"Sugar" Cookies (+ VIDEO!)

Copyright © Carrie Brown 2010-2020, unless otherwise stated. All rights reserved.

How To Chop An Onion (VIDEO)

Learn how to chop an onion! Cooking skills for any dietary lifestyle you are following – keto, paleo, lowcarb, whatever – here’s a fast and easy way to dice an onion into beautiful uniform pieces that doesn’t require you to be a knife ninja, top chef, lose any of your fingers, or have you bawling!

? Fennel Tarragon Lamb Shanks Recipe: https://carriebrown.com/archives/36381

?‍? More fantastic keto recipe videos for you here: https://www.youtube.com/playlist?list=PLsAjYYF3K0dy_b74EVTGicZwJPS1Wl28F

Handy equipment list: https://carriebrown.com/archives/23310
Handy ingredients list: https://carriebrown.com/archives/23109

? Keto Recipes, Resources and fabulous Cookbooks: https://carriebrown.com

? Get THE INSIDE SCOOP: https://dogged-mover-1658.ck.page/a3e50a5b41

❤️ This how to chop an onion video made possible by the generous pledges from our Patreon supporters for whom we are profoundly grateful. Join our mission to help as many as we can! https://www.patreon.com/CarrieBrown


0 comments
Add a comment...

Your email is never published or shared. Required fields are marked *

    Spicy Beef Liver & Bacon Pate

    I love pate. All kinds of pate. As an added bonus, pate is an excellent way of disguising things like liver into something rather fantastic. Especially when you add bacon. Because as everyone knows, everything is better with bacon. Adding some spiciness further masks the liveriness of it all. Thus, I give you Spicy Beef Liver & Bacon Pate.

    Liver and Bacon Pate | Yogi Parker
    Liver and Bacon Pate | Yogi Parker

    An extra step I take is to marinate the liver in an acid like yogurt which helps remove some of the liver flavor.

    If you’ve been nervous to try liver this is a fabulous way to put on your training wheels! Give it a shot!


    Spicy Beef Liver and Bacon Pate

    Author: Yogi Parker| Prep time:  15 mins   |   Cook time:  15 mins  |   Total time: 30 mins  |  Serves: 8 – 12

    What You Need

    • 1lb (454g) beef or calf liver
    • 6oz (170g) yogurt
    • salt and pepper
    • 1lb (454g) bacon
    • 1 bell pepper, seeded and chopped
    • 8 oz. / 225g white or yellow onion, chopped
    • 1 jalapeño, diced and seeded
    • 1 tsp chili pepper flake
    • 1 1/2 tsp. dried sage 
    • 1 tsp. cumin
    • 2 tsp. chili powder
    • 2 tsp. paprika
    • 4 TBSP collagen powder 
    • OPTIONAL: Fox Hill Kitchen Bunz, Croutonz, or Bagel Holez (Use code: carrie for a 15% discount!)

    What You Do

    1. Rinse the liver with cool water, pat dry, and season lightly with salt and pepper.
    2. Cover the liver in the yogurt and let it marinade overnight.  The acid from the yogurt will help cut down on the liver taste.  
    3. Chop the bacon into pieces, and brown the bacon over medium heat in a skillet.  
    4. Remove the browned bacon and set aside, keeping the bacon grease in the skillet.  
    5. Reduce the heat to medium low.
    6. Add the veggies in and sauté until the peppers are tender and the onions are translucent.  Remove the veggies from the skillet and set aside.
    7. Put all the dry seasonings into a bowl and mix it all together.
    8. Remove the liver from the yogurt and rinse it off. Discard the yogurt.
    9. Liberally season one side of the liver with the seasoning and place the seasoned side of the liver down in the bacon grease and season the other side.  Cook for about three minutes on each side and remove.
    10. Put everything in a food processor, including any leftover bacon grease and collagen, and purée until everything becomes a smooth mixture.  
    11. Spoon the mixture into a container, or portion it out into several containers, cover, and let sit in the fridge overnight before serving.

    Top Recipe Tips

    • If you really don’t like the taste of liver, increase the ratio of bacon to liver by reducing the liver and doubling the bacon.
    • If you don’t like spicy, omit the jalapeño.
    • Serve on some keto bread like Fox Hill Kitchen Bunz  (Use code: carrie for a 15% discount!), or some keto crackers or cheese crisps. We served it with the Fox Hill Kitchen Bagel Holez (pictured), butter, and cucumber sticks.
    • To make individual portions, put the pate into silicone molds and freeze. Once frozen, remove from the molds and store layered in parchment in airtight containers in the freezer.

    Helpful Cooking and Recipe Links

    Podcast Episodes and You Tube Videos

    Substitutions

    • Don’t. Just buy the correct ingredients and you, too, shall have a fabulous outcome!

    Spicy Beef Liver and Bacon Pate | Yogi Parker
    Liver and Bacon Pate | Yogi Parker


    4 comments
    Add a comment...

    Your email is never published or shared. Required fields are marked *

    • Laura Owenscan the collagen be omitted? what purpose does it serveReplyCancel

    • Sherry HinksonWhat is the other condiment/sauce/dip pictured on the serving tray? Can’t wait to try the late! ReplyCancel

    • MaryCan this recipe be used to can beef liver?  I was gifted some liver and I would like to preserve it and have it ready to use.ReplyCancel

    • MaryIs it possible to can this recipe in small half pints?ReplyCancel

    Fatty Drunken Poke

    I was introduced to poke at my best friend’s Hawaiian restaurant. It was one of my favorite things to get after a day of surfing or working at the YMCA as a lifeguard or swim instructor. I fell in love with the flavors, the freshness of the fish, and the taste of the seaweed in the marinade. When I later traveled to Hawaii I got to taste a bunch of different poke at one of the best poke shops in Honolulu. This is one of my favorite raw fish style dishes and now I want to share it with you. So today I’m sharing with you my Fatty Drunken Poke!

    Fatty Drunken Poke | Yogi Parker
    Fatty Drunken Poke | Yogi Parker


    Fatty Drunken Poke

    Author: Yogi Parker| Prep time:  20 mins   |   Marinating time:  1 hour+  |   Total time: 1 hour 20 mins  |  Serves: 4

    What You Need

    What You Do

    1. Combine first 5 ingredients together for the sauce and combine well using a whisk.
    2. Put the fish in a bowl and add two thirds of the sauce.  Toss to make sure all the fish is covered well.  Cover and put the fish in the fridge to marinate for at least 1 hour. I generally allow it to marinate for at least three.
    3. Put the seaweed in a bowl and add enough lukewarm water to cover.  Allow the seaweed to sit in the water for about three or four minutes until seaweed becomes tender.
    4. Drain the seaweed well and chop into bite sized pieces if necessary.
    5. Mix all the veggies together with the fish and the remainder of the sauce and mix to combine well.
    6. Add sesame seeds and salt and give a quick toss to incorporate but not melt the salt.
    7. Serve with an additional sprinkling of sesame seeds and salt if you want.


    Top Recipe Tips

    • Ahi, yellowtail, and other types of tuna are great in this dish, as is fresh salmon.  Octopus is also great.
    • If you want to spice things up a bit, add some red pepper flake or some sambal oelek (chili pepper paste).

    Helpful Cooking and Recipe Links

    Podcast Episodes and YouTube Videos

    Substitutions

    • Don’t. Just buy the correct ingredients and you, too, shall have a fabulous outcome!

    Fatty Drunken Poke | Yogi Parker
    Fatty Drunken Poke | Yogi Parker


    0 comments
    Add a comment...

    Your email is never published or shared. Required fields are marked *

      Blackberry Almond Fool

      If you do an internet search for ‘Fool’ or ‘Fruit Fool’ you would likely leave thinking that it’s just some kind of pureed fruit layered with whipped cream. I’m here to tell you, though, that ain’t no Fool. That’s a lazy way of making something that looks like a Fool, and possibly even feels like a Fool when you eat it. Nope, that’s not us. What we’re making here today is a proper Fool. One that is made with custard. And, because all the other berries seem to get loads of recipe love all the time, we’re making Blackberry Almond Fool.

      Blackberry Almond Fool | Carrie Brown

      Blackberries have – for some reason – been front and center at my local grocery stores this year, so I figured it was The Universe encouraging me to share some blackberry love with the keto world where typically there is only strawberry, raspberry, and blueberry love.

      Around my parts the blackberries have not only been more plentiful but also cheaper than their other berry cousins, and when something is delicious, plentiful, AND cheap, you make hay while the sun shines. Or in this case you make Fool while the blackberries are cheap.

      I hope this blackberry trend continues. Lower in carbs than both raspberries and blueberries, and only marginally higher in carbs than strawberries, having another flavor in our keto food arsenal is never a bad thing.

      Blackberry Almond Fool | Carrie Brown

      You may already have made the Infallible Awesome Almond Custard. AKA the Amazing Blender Almond Custard. You might en have some lolling in a vessel in your fridge, in which case this Blackberry Almond Fool is a super-easy – and stunningly pretty – win to your dinner table.

      If you have yet to make the Almond Custard – let me assure you that it is a breeze to make. Once your custard and blackberry puree are completely cold, it’s just a matter of whipping some heavy cream and doing a spot of folding and layering.

      Blackberry Almond Fool | Carrie Brown

      This Blackberry Almond Fool is something very simple but quite gorgeous that would do equally well at a fancy soiree or a picnic on your own back lawn.

      Even better – you can make the custard and blackberry puree days ahead of time. Meaning that on the day all you need do is whip that cream and spoon it all together. What could be easier?!

      I did not make this super-sweet, so check out the Top Tips below if you think you or your peeps will want it really sweet.

      With a container of Almond Custard on stand-by in your fridge and berries on hand you can get this beautiful and delicious dessert ready in a few minutes. This might just be your new go-to dessert!


      Blackberry Almond Fool

      Author: Carrie Brown | Prep time: 10 mins | Cook time: 10 mins | Total time: 20 mins (less if just assembling all the bits) | Serves: 6

      What You Need

      What You Do

      1. Put the blackberries in a small pan with the water and sweetener and stir well.
      2. Place the pan over a medium heat and bring the blackberries to a boil. Immediately turn the heat to low and simmer until berries are super soft.
      3. While whisking quickly with one hand, gently sprinkle the konjac flour evenly over the surface of the cooked berry syrup and continue whisking to incorporate all the konjac.
      4. Continue to heat and whisk the berry syrup for another minute until thickened, then remove from the heat, pour carefully into a glass storage container and allow to cool completely before covering and placing in the fridge.
      5. When you have your cold Almond Custard and cold blackberry syrup ready, place the heavy whipping cream and almond extract into a large, cold bowl and whip until the cream forms soft peaks.
      6. Spoon 2 cups of Almond Custard into your whipped cream and gently fold them together until completely mixed.
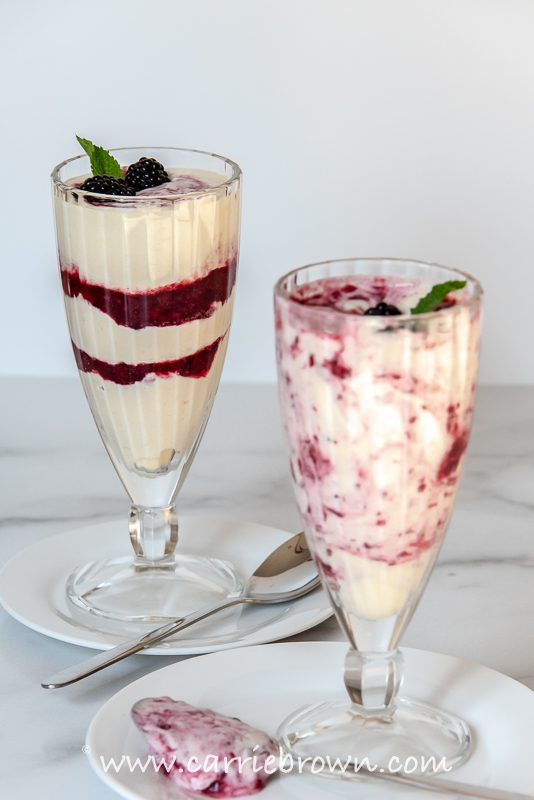
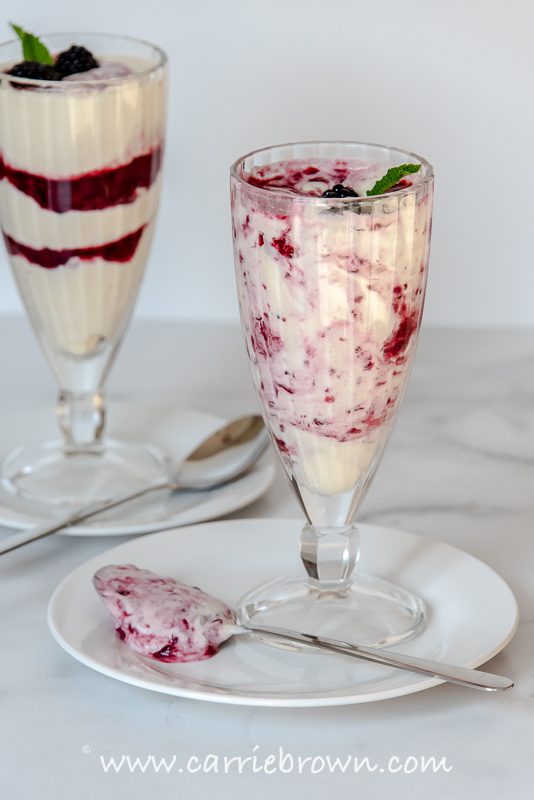
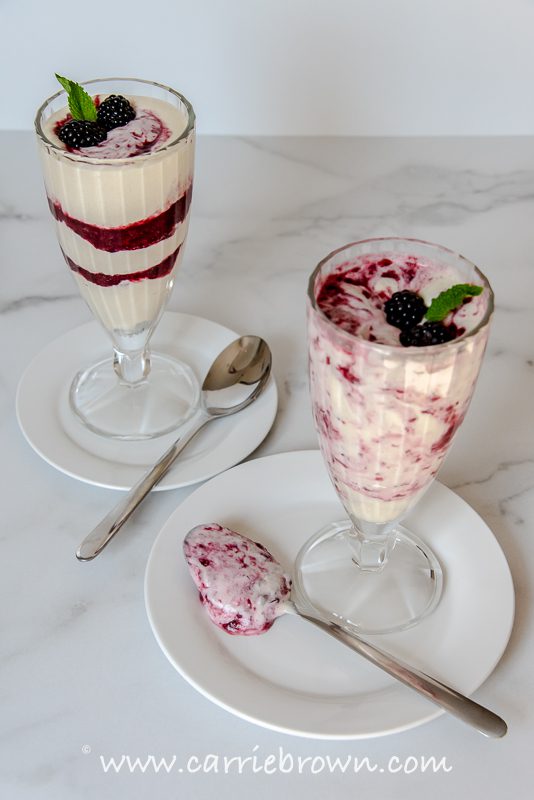
      7. Spoon some of the cream custard into glasses and then spoon blackberry syrup on top, continuing in layers until the glass is as full as you want it. You can either make very separate layers, or gently swirl the layers together as you go to create the marbled effect.
      8. Top with a couple of fresh blackberries. Add a sprig of fresh mint if you’re feelin’ fancy.

      Top Recipe Tips

      • You can use other berries (they all pair well with almond) but you may need to adjust the sweetener a little either way to compensate for the differing natural sweetness of the various berries.
      • I deliberately did not make this Fool super sweet, since many folks on keto find they lose their sweet tooth, or want to lose their sweet tooth! You can add extra sweetener to the blackberry syrup if needed, and you can also add some powdered sweetener to the whipped cream before you whip it if you think you will need it to be sweeter.
      • Check out the video on ‘folding’ ingredients together!

      Helpful Cooking and Recipe Links

      Podcast Episodes and You Tube Videos

      Substitutions

      • Don’t. Just buy the correct ingredients and you, too, shall have a fabulous outcome!
      • Xylitol and allulose are the sweeteners I recommend because they work very well. I also recommend erythritol if allulose or xylitol give you issues, but erythritol can be tricky to use successfully. You can use any other sweetener you like, but I cannot guarantee the results if you choose to use something different. In low carb and keto baking sweeteners are generally not interchangeable if you want great results.

      Blackberry Almond Fool | Carrie Brown
      1 comment
      Add a comment...

      Your email is never published or shared. Required fields are marked *

      • susan m.Hi Carrie! I notice that sometimes you use ‘cup’ and sometimes oz…is that volume vs. weight measurement?ReplyCancel

      Almond Custard (+ VIDEO!)

      Custard. Is there anyone that doesn’t like custard? I actually thought that custard was a fully British thing and that no one in America would care about there being such a thing as keto custard. Turns out I was wrong. And while one doesn’t really like being wrong, there’s times where being wrong opens up a while new avenue of awesome. Like being wrong about custard. So today I made you awesome custard. Awesome Almond Custard, to be precise.

      Almond Custard | Carrie Brown

      I also decided, while I was dreaming up the Awesome Almond Custard, that it would be super awesome if we could avoid all the night-sweats and terror that often accompany the making of custards.

      Thus, I made you Infallible Awesome Almond Custard. Or Amazing Blender Almond Custard. And actually, you could even do this without a blender if you have a whisk and a bit of muscle in your whisking arm.

      This Almond Custard is a breeze to make – it takes one minute longer than measuring out your ingredients – and then just needs a gentle warming on the stove top before you’ll have a jug full of hot, creamy, delicious custard to pour over your dessert. Or you can leave it to cool for a thicker cold custard that can be used either as a sauce or a dessert in it’s own right, or used as in ingredient in some other luscious recipe.

      Almond Custard | Carrie Brown

      Not using your custard immediately as a hot sauce? You can either leave it to cool completely in a large bowl or other container before covering and putting in the fridge, or you can pour it into single-serve baby Mason Jars or  baby Pyrex (so adorable!), cool, cover, and just whip one out as dessert when you need.

      If you’ve been scared of custard-making all this time, this is your moment. Perfect Almond Custard shall be yours. In a matter of minutes. It really is super fast and easy and I urge you to get some made today.


      Almond Custard

      Author: Carrie Brown | Prep time: 3 mins | Cook time: 10 mins | Total time: 13 mins | Serves: 10 as a hot sauce, 6 – 8 as dessert

      What You Need

      What You Do

      1. Put the allulose or xylitol, sea salt, almond milk, almond extract and eggs into the blender and blend on low speed until completely blended.
      2. Turn the blender to it’s lowest speed and remove the center piece from the blender lid.
      3. Turn the blender speed up slowly just until a vortex is created and then tap the konjac and the guar gum through the hole in the lid.
      4. Blend for only 10 seconds.
      5. Pour the custard into a saucepan and warm over a low heat, stirring constantly, until the custard has thickened and coats the back of your spatula.
      6. Pour into a jug to use as a hot sauce immediately, or pour into a clean glass container and leave to cool completely before covering and storing in the fridge to use in other recipes or as a cold sauce.

      Top Recipe Tips

      • Have your phone, iPad, or a book to hand when you’re ready to start warming and stirring. Unless you are one of those people who can be still and meditate in silence while stirring. I thoroughly recommend the latter, but realize that’s not a thing for many, and you can accomplish a lot online in 10 minutes while also stirring your custard. If you’re multi-tasking, don’t forget to keep that custard moving!
      • Once the custard has thickened to coat your spatula, turn the heat off. Heating eggs too high or for too long is never a good thing. They leak. They split. They just get ugly.
      • I do NOT recommend you using erythritol or erythritol blends in this recipe.

      Helpful Cooking and Recipe Links

      Podcast Episodes and You Tube Videos

      Substitutions

      • Don’t. Just buy the correct ingredients and you, too, shall have a fabulous outcome!
      • Xylitol and allulose are the sweeteners I recommend because they work very well. I also recommend erythritol if allulose or xylitol give you issues, but erythritol can be tricky to use successfully. You can use any other sweetener you like, but I cannot guarantee the results if you choose to use something different. In low carb and keto baking sweeteners are generally not interchangeable if you want great results.


      5 comments
      Add a comment...

      Your email is never published or shared. Required fields are marked *

      • LindaHi, will this thicken to a custard consistency as it cools or will it stay as a softer “sauce” consistency? ReplyCancel

        • carrieHi Linda! I am not sure how thick American custard normally thickens to. This cools to a much thicker – but still (just) pourable – sauce. Hope that helps!ReplyCancel

      • DonnaWill this technique work for making ice cream custard?  I have a terrible time trying to temper the eggs.  Someone needs to come out with a way to use the soup function on a Vitamix to temper eggs for ice cream base.ReplyCancel

      • Kelly BarringerIf I don’t have almond milk will the recipe flop with HWC? ReplyCancel